In the section Playlists(1) you can create a playlist by hovering above the orange action button(2) and click on „+“(3).

The following page will be in the dark theme which means you are currently doing an action that will affect your system.
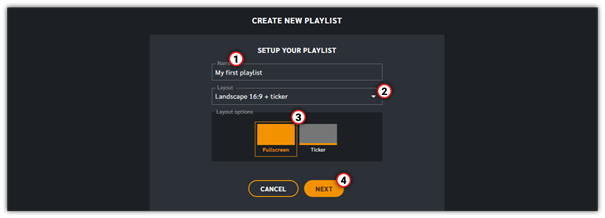
The first step of creating the playlist is to give it a name(1. Selecting either portrait or landscape(2) from the drop down menu will present you with straight forward fullscreen layout-options(3) available. Layout options may vary depending on your specific structure. When you have selected the layout option according to what orientation you plan on scheduling to you go to next(4).
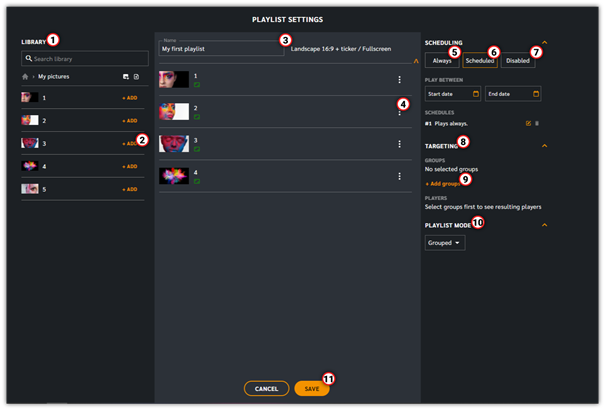
Now we get to the actual playlist part. On the left side, you have your library(1). You can search the library or navigate the folders to find the content you want to add to the playlist. Either click on +add(2) or drag and drop the file in the playlist.
The playlist is the center part of the screen and it plays from the top down when scheduled on a player, keep this in mind when sorting the order of the content. You can change the order by drag and drop the items in the order you want. The 3-dot menu(3) on each item gives you the option to edit or remove them from the playlist, this does not remove them from the library.
At the top, you can at any point change the name of your playlist(4)
On the right side you have the schedule, when and where should the playlist play?
- Always(5) will play the playlist from today and until it is removed.
- Disabled(6) will not publish the playlist at all, it will remain inactive until it’s scheduled. This is used for preparing a playlist but still missing content or groups.
- Scheduled(7) brings up start/stop – dates, start/stop- time.
When you have set the time when it should be playing we move over to where it should be playing. Below the dates you have the targeting(8) section, this is where you can select what groups this playlist should target. Click on + add groups(9) to bring up the groups that are available.
The playlist mode(10) gives you couple of options on how this playlist should interact with other playlists scheduled on the same player. These options vary depending on your workspace settings. Most common options are „Grouped“, which keeps the content in this playlist grouped together without splitting them up, and „Shuffled“ which can split this playlist up to have it’s content play in-between other playlists.
When you have reviewed your playlist you can click the save(10) button. If the content is scheduled to start now then the players targeted will notice the change within 10 minutes and start downloading it’s new schedule.